Typewriter Day 2009, that is. If you're a member of the Italian Orthodoxy, you might have celebrated this back at the end of April, but there's enough typer-love in this world to celebrate on June 23rd as well, a.k.a. the anniversary date of the U.S. patent granted to Christopher Scholes. I have to admit to being a little over-planny with last year's celebrations as it seemed to require as much coordination and general fussing than other projects in the news, and with apparently less overall success.
Any ideas for this year? I like the public typing component of it, especially as one of our number has shown it to not only be easy, but entertaining as well. I still like Olivander's find of a letter-writing-service for imaginary persons, and judging by the comments in the post, this idea got a few of you thinking how you might burn through your fabulous stationery supply.
What say all of you?

Thursday, May 28, 2009
Tuesday, May 26, 2009


Intelligent Fatigue
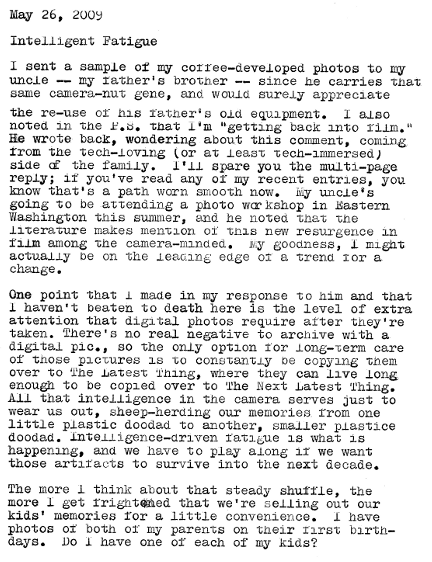
By request, a typecast from my Remington Ten Forty (as yet unnamed) temporarily borrowing Norma Jean's own ribbon. Annoying as the donut-style spools may be, at least they are interchangeable. As you can see, some type slug cleaning may be required here.
Friday, May 22, 2009
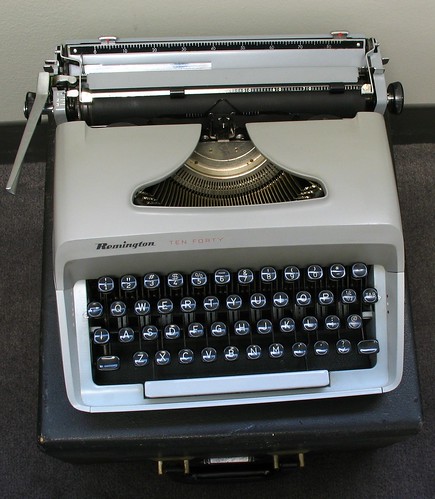
The Twofer

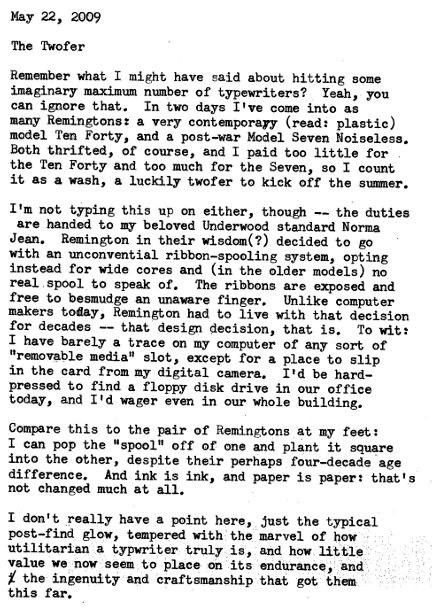
I've become much happier since deciding that I'm really a sucker for pity-case typewriters, especially ones that would be hopelessly bent and maimed by the hands of bored children in tow behind their mothers at the thrift store. I'm providing a service here, honest!
Wednesday, May 20, 2009
Strange Brew
 Hey, it worked!
Not that I should be too surprised. Despite the unlikely-sounding recipe, the chemistry is founded on some solid science, published in a few places besides the interwebs. But still, seeing is believing, as they say. And now I'm sure you're burdened with questions, which I will attempt to address:
Q: What am I looking at here?
A bunch of firsts. I recently bought a 100-foot roll of inexpensive black-and-white 35mm film from Freestyle photo and wound it onto recycled cartridges from Walgreens, using a bulk film loader from the thrift store. First time I'd ever used a bulk loader, or handled that much film in one go. I just finished shooting my first homemade roll of the stuff today.
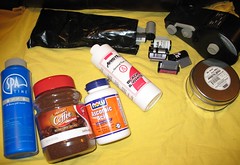
In the true retro-tech DIY spirit, I also made a batch of Caffenol C developer out of mostly-common household ingredients, and following the spotty and conflicting directions on the Internet, developed this roll tonight.
Q: Caffe-whatnow?
"Caffenol," a jokey name for this particular blend. Recipes are varied, and some call for the addition of vitamin C -- hence Caffenol C --to speed up the development process and give clearer negatives. My Super-Sekrit Recipe (don't tell!) is:
For one roll of 35mm film:
- 1 round teaspoon of vitamin C powder (acetic acid, from the health food store)
- 2 round teaspoons of washing soda (a.k.a. soda ash, or sodium carbonate) This is not baking soda.
- 4 round teaspoons of the cheapest instant coffee available (regular, not decaf)
- 8 oz. of water at 68 degrees F/20 degrees C
- Mix coffee with about half of the water in a container.
- Mix vitamin C and soda ash with remaining water in another container. Caution: this becomes fizzy
- Stir both until all powder/coffee is totally mixed into the water
- Combine both mixtures and let stand 10-15 minutes for "micro-bubbles" to settle
- Develop 12 minutes, agitating twice per minute for about ten seconds per cycle. Without the vitamin C this step reportedly takes 20-30 minutes, and the negatives come out a tad foggy.
- Use a water stop bath, um, until the water is clear? Didn't time this step.
- Use commercial film fixer for recommended time (I did 3 min.)
- Wash in water, add drop of Jet Dry and hang in shower to dry overnight (see above pic)
You really need to experience it for yourself. My initial reaction was "Ugh. Oh God. Ugh." It smells so reasonable before it's all mixed together.
I think it smells like coffee and old grease. My son said it smelled like "liquid [explicative]" right before he was sent to his room. It's bad, but not clear-the-house bad. Next time, I'm going to mix it up before I roll my film onto the spools, so I'm not in the same room during its 10-15 minute "breathing time." Phew.
Q: What's the science behind this?
Something about the caffeic acid in the coffee being the developing agent, which is in a higher ratio in instant coffee, due to the cheaper beans used and the roasting process. The soda ash helps goose it along, and the vitamin C boosts it a bit more. Keebler-elf magic and chicken entrails, as far as I'm concerned. But it works. Those negatives look great, certainly on par with the stuff I developed years ago in D-76, or whatever it was we used in class.
Q: Speaking of D-76, why not just buy commercial developer? It's faster, more consistent, and cheaper.
Oh, come on. I use typewriters and fountain pens. Why do anything easy? Besides, it's insanely cool, not just unrolling the film from the spool, but knowing that every part of that process was controlled by me.
Just try it.
Q: What's next?
Once the negatives are dry, I'll put them into some sleeves and see if I can rig up a digital-camera-scanner setup. There's a cereal box near me right now that might make a great daylight lightbox. Stay tuned, coffee achievers.
UPDATE: A few results...


click to embiggen
All softness in these edges of these images is due to my terrible "handoscan" technique (aka, negatives up against the window). I'm amazed how good these look. As a whole, they're a bit dense, but I think that's due to operator error, not the developing process.
Sounds Wonderful
Right now, stop what you're doing and listen. Hear anything?
If you're at home, you're probably surrounded by various neighborhood sounds. The springtime sounds in my suburb are made by the swarms of lawn-care crews running ungodly leaf blowers, chasing invisible clippings into adjoining yards for their service to clean up. (Does no one besides me mow their own grass these days?) If you're in an office, you've likely got the drone of some air-moving machinery, a slight hum from your computer and the light fixtures, and maybe some traffic noise if you're lucky enough to be placed near a window. What's it sound like by you, right now?
Personally, I can't handle silence. I need something happening in the background to work, and at least since college, that "something" has been music, supplied then by hauling my Walkman and a couple of cassettes down to an isolated study carrel, and now by CDs piped through my computer's speakers. Even having the volume down low is better than no sounds at all. And I've added a thrift-store travel alarm clock to the mix -- mechanical, of course -- just for the steady tick-tick-tick it makes in the background. I need this noise, to keep me grounded in the real world. Coding datbases is a solitary, silent existense, and I guess I need a little reminder where I really am when my head is full of tables and queries and joins.
There's a discussion going now on one of the mailing lists about musical typewriters: not typewriters that make music, but that are designed for printing it onto the page. Maybe what I need here is my own typewriter music -- a regular click-tap-click of a machine being put through its paces, measuring and marking off ideas like this little clock measures off the seconds. Sounds wonderful to me. Anyone up for sitting nearby and providing me with a little mechano-musical accompanyment? The pay's not great, but the audience is rapt.
Wednesday, May 13, 2009
Back to Old School, Redux
I'm glad that my order from Freestyle Photo arrived yesterday, before I saw Monda's post about the BARPs now available on eBay. The last thing I need now is another temptation. As it was, though, FedEx beat the internets on this one, and my film and fixer are in. My mad-scientist fantasies are almost complete!
(late-night photo taken when giddy from bulk-loading all the film)
As predicted, I was able to get about 20 rolls of film from the 100' spool, and only goofed up twice. Once I failed to place the film over the little sprocket wheels that run the counter, and once at the end of the spool when I pulled the end of the film all the way into the canister. (It was only about 10 frames, not worth retrieving.) Assuming no colossal light-leaks in the loader, or foul-ups in my process, I should be set for film for a while.
Next order of business is the camera. As you certainly know, I have no shortage of the silly things. I'm still going to pull out dad's old Minolta to shoot some of this up, but I've decided to use one of my "inheritance cameras" for the first roll, my grandfather's old Rollei 35. Here it is, presented next to one of my bulk-loaded rolls for scale:
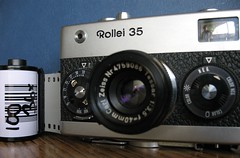
My love of the macro lens doesn't do this thing justice. Lying flat on its back, the camera will easily fit within the bounds of a 3x5 card, with space around the edges. It's that tiny. I recall getting this camera around the same time I got the Minolta, when my grandfather was still alive but starting to fade due to the effects of Alzheimer's. I do know that I never really asked him about it or using it, and am only now beginning to appreciate the quality of this tiny little camera. It is supposedly the smallest mechanical full-frame 35mm camera ever made, and I used it for a while, though I tended to favor the SLR, despite its heft and noise. By comparison, this little Rollei is nearly silent, and very pocketable -- the lens retracts into the body -- and just plain elegant. I know that my grandfather also bulk-rolled his film, as I've got at least one vintage metal Kodak can sitting around from his estate, and though he tended to prefer medium-format over 35mm, I'd like to think that all this experimenting is guiding me into his footsteps.
(late-night photo taken when giddy from bulk-loading all the film)
As predicted, I was able to get about 20 rolls of film from the 100' spool, and only goofed up twice. Once I failed to place the film over the little sprocket wheels that run the counter, and once at the end of the spool when I pulled the end of the film all the way into the canister. (It was only about 10 frames, not worth retrieving.) Assuming no colossal light-leaks in the loader, or foul-ups in my process, I should be set for film for a while.
Next order of business is the camera. As you certainly know, I have no shortage of the silly things. I'm still going to pull out dad's old Minolta to shoot some of this up, but I've decided to use one of my "inheritance cameras" for the first roll, my grandfather's old Rollei 35. Here it is, presented next to one of my bulk-loaded rolls for scale:
My love of the macro lens doesn't do this thing justice. Lying flat on its back, the camera will easily fit within the bounds of a 3x5 card, with space around the edges. It's that tiny. I recall getting this camera around the same time I got the Minolta, when my grandfather was still alive but starting to fade due to the effects of Alzheimer's. I do know that I never really asked him about it or using it, and am only now beginning to appreciate the quality of this tiny little camera. It is supposedly the smallest mechanical full-frame 35mm camera ever made, and I used it for a while, though I tended to favor the SLR, despite its heft and noise. By comparison, this little Rollei is nearly silent, and very pocketable -- the lens retracts into the body -- and just plain elegant. I know that my grandfather also bulk-rolled his film, as I've got at least one vintage metal Kodak can sitting around from his estate, and though he tended to prefer medium-format over 35mm, I'd like to think that all this experimenting is guiding me into his footsteps.
Friday, May 8, 2009
The Future of the Past
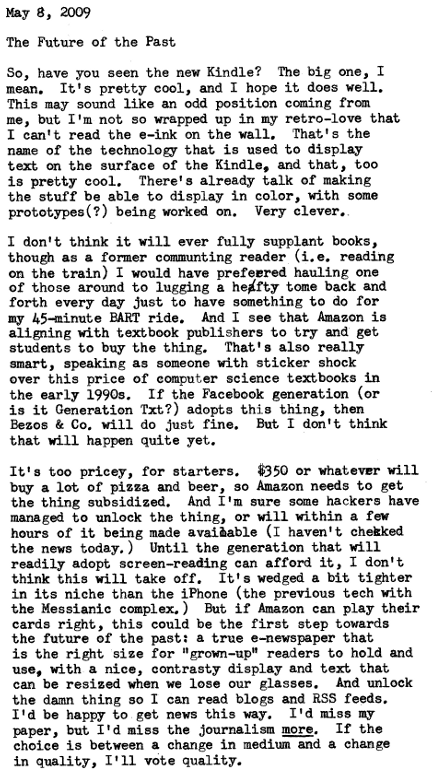
Kind of random today, I should never post before the brain is fully awake. One of the most imperfect things about the Kindle is its name. I'm sure some marketing wonk was thinking "kindling a spark of excitement" or the future, or something, but books + flames = bonfires in my mind, and that never ends well. I think the Kindle is a first step, and if it succeeds, we'll see much better steps down the road. I've been a big naysayer of the small version, but this bigger one... nice.
Wednesday, May 6, 2009
Fumbling Around in the Dark
Mr. Speegle officially Threw Down and called me out by name, and so I shall punish his effrontery with a post I like to call...
First, let me start at the end by recommending what I think is probably the best book for up-and-coming shutterbugs. It's simply titled Photography by Barbara London and John Upton and is the book that my dad got for me when he handed over his old Minolta. The illustrations are excellent, and drive home concepts like "depth of field" and how aperture and shutter speed work together to get a certain type of image on film. There are tons of books out there, but this is the one I always turn to, in no small part because of the clear illustrations and step-by-step photos. The edition I have is now hopelessly out of date with regard to modern camera technology, but the science hasn't changed. As such, I have cribbed mercilessly from them. Hey! I bet your library has a copy. Mine's the fourth edition, looks like they're up to the ninth edition now.
Also, a disclaimer. I have not tried -- nor desire to start -- at-home color film processing. Color is a more persnickety mistress than black-and-white: the chemicals are a bit more involved, the temperatures are higher, and the timing is far more exact. If you like sorting your sock drawer by style then size then color then fiber, color processing is for you, and this post is not. Sorry. I think the best place to get color done is at your local mega-mart, where a pimply teenager will be happy to give you a strip of machine-processed negatives in an hour for under $3, and maybe even scan them onto a CD for about $5 more. You can't beat that kind of a deal, folks.
Let's Begin!
To develop your own film, you need:
The instructor of the adult-ed classes that I took was pretty much the example of your wild-eyed greybeard photographer, and could charitably be called particular in his preferences. One thing he did stress is you'll get a lot more mileage out of stainless steel than plastic reels and tanks, aka, "the thing that holds the film" and "the thing that the film and chemistry slosh around in." Plastic reels are supposedly easier to load, though he swore that they also made it easier to mangle film if you did it wrong. Stainless requires a bit more effort, but clean-up is a breeze. I inherited stainless from my grandfather, that's what I learned on, and that's what I use. Your mileage, as always, may vary.
Back now? OK, here's what you need to do:
(1) Igor, prepare the lab! If you're using anything that's going to be shared between chemicals (like a measuring cup) be sure to clean it out well between chemicals.
According to the directions that came with your chemicals, you're going to mix up a batch of developer, usually diluting a liquid or a powder by some ratio of developer:water.
"Stop bath" is generally not necessary, it's just the stuff you dump in after developing to make the developer stop doing its thing. Running water from the tap is fine here, and pretty common. If you're made of money, though, hey... stop bath away, my friend. I've read that acetic acid can be used here in a dilution, and have heard of some people using a vinegar bath here.
"Fixer" is the last real step. This is the stuff that gives the light-sensitive side of the film (the "emulsion") one final scrub before it goes out into the world and gets all fingerprinty. You may be diluting this to use once and then toss out ("one-shot") or just pouring from the bottle into your tank, and then pouring back later. Depends on what you bought, and I don't think one is any better than the other.
Crucial thing with the chemistry is that all your chemicals and waters should be about 68 degrees Fahrenheit/20 Celsius. This is an "about" temperature, and you can go over or under without much trouble. Wild temperature swings between steps will do funky things with your emulsion, as will very high temps. Your developer should have a recommended temperature printed on the bottle or the instruction sheet, follow that.
(2) In the dark, wind up your film. Open your film canister with the bottle opener. If you hold the film in your hand with the little knob bit pointing upwards, you should be able to get the opener on the lip of the bottom piece and pry it off. The film is loosely wrapped on a spool inside the canister, which will now evade your grasp and bounce all over the effing bathroom floor, unwinding as it goes. And now you know why I use a changing bag. This is just pair of black nylon bags, one inside the other, with a pair of elastic-cuffed sleeves sticking out. Imagine a windbreaker without a neck opening and you've got it. The idea is that you put all your "dark stuff" in the bag (spool, canister, film, bottle opener) and zip the bag shut, then pop your hands in the sleeves, and set to work. (Note: after opening the film and effectively locking your arms in the bag, it is required that your nose itch maddeningly for the duration.)
The film will be taped on to the little spool right at the end. You're strong enough to pull this off, the film will be fine (that end isn't exposed anyway.) Some directions have you trim off the tape, or the leader at the start of the roll. I say: they aren't hurting anything, and if you're using stainless steel (ahem) you can load the whole thing, tape, leader and all on the reel. Put the tape end in first, and finish with the leader. Besides, playing with scissors in the dark? Honestly. Doing this little trick does mean that you're going to unwind the whole roll of film to get to the taped end, but film is very curly, and will want to wind back up as it's coming off the spool. Go ahead and let it make a little neat roll in your other hand.
Winding film on a spool is the absolute hardest part of this process. If you can do that, you can do all the rest of this, and that's why I think people gravitate towards plastic. The best way to learn how to wind is to sacrifice some film -- any kind -- and practice loading, loading, loading in broad daylight until you get it. Then try it in daylight, but with your eyes shut. Then under a coat so you can't peek, etc.. You have to be able to do this step totally by feel, ideally by only holding the edges of the film. Once you have this step down pat, you're good to go. And you can do it. With practice.
(3) Place spool in tank, cover, and soak. If you're using a daylight tank, get your spool in there, place the lid on the tank, and turn on the lights or open the bag. Removing only the little light-trap cap, pour some water into the tank, enough that you're covering the film inside. I wait until it starts to splurt back out. Pre-soaking the film isn't required, but again, it's how I learned, so...
When you think about it, film is magical stuff. Teeny tiny little particles of light-sensitive stuff, hanging out in essentially dried Jell-O, waiting for the right chemicals to embiggen them into crystals visible by the naked eye. Pause for a moment here to be dazzled by the coolness of what you're doing. Digital weenies don't get to ponder this sort of thing.
(4) Bath time. Removing only the little light-trap cap, dump out the water from your tank. Pour in your carefully measured and temperature correct developer, noting the time when you do this, replace the cap, and gently agitate the tank. "Agitate" here means "hold the lid and cap on with your fingers as you slowly turn the tank over" not "shake the living hell out of the tank like you're mixing cocktails at your brother's wedding." A few easy inversions back and forth will do it. Some folks like to throw in a lucky tap or two on the counter to knock bubbles off the film at the end of a cycle: go crazy. Just don't make a frothy umbrella drink in your tank.
You'll be doing this agitation dance for a while, for a minute or so straight at the beginning, then a couple of inversions every 30 seconds for anywhere from about 15-20 minutes. Follow your developer's instructions. When I first started processing my own film, I would always panic at this step, since I'd be concentrating so hard on the agitating that I'd forget when I poured in the developer. I've since learned to wait until the minute hand was somewhere easy, and then repeat to myself the time it comes out on every inversion. "The film is done at 1:17... *swish*... the film is done at 1:17... *swish*..." I call it "photography Tourette's."
Not using a spool and tank? What, are you a masochist or something? OK, you can do this in the dark, though you'll have to have all your chemicals mixed up and ready in advance, and in open-air containers like old mixing bowls You can hold both ends of the film, and kind of rock it through the developer, working your way down the length of the film in a "U" shape and then back again. I don't know what you're doing for time, though -- maybe counting? Do the same thing for your bowl of fixer. As soon as you get out of the bathroom, though, get online and order a daylight tank and some reels.
Your developer package will tell you how long you need to soak your film: there's usually a table printed that shows major film brands vs. temperature, and you look up the number of minutes from that. Warmer developer means less time, but often results in grainier negatives. Too cold and the chemistry won't "take" as well. Follow the directions here, but don't panic if you're off by a degree or a minute or two. Black and white film is pretty forgiving.
Agitate every 30 seconds or so, with the last agitation ending in you dumping out the developer, either down the drain, or back into the bottle. If you did any sort of mixing to prepare your developer, then it's done, but if you're using pre-mixed stuff, you can be thrifty and mix it back in to your bottle. This recycling will eventually exhaust the developer and you'll need to get new stuff. (Caffenol is one-shot.)
(5) Stop, Dog, Stop! Development time all done? OK, time for the stop bath. You can use another chemical mix for this, or running water. I place my tank under the tap in the sink with only the little light-trap cap removed, and let water pour in and wash the film, periodically dumping it out to flush out any goodness floating near the bottom.
(6) Get fixed. The last real chemistry-ish step is to pour in the fixer. This takes less time than the developer, directions should be printed on the box/bottle/package about the amount of time, but it's typically on the order of a couple of minutes of occasional agitation. Fixer can generally be saved and reused. The fixer helps to harden the emulsion layer so it's tough enough to handle storage and scanning and the like.
(7) Wash up. If you've done everything in order, you should be able to safely expose your film to light now, and naught but the ravages of time and your own klutziness will harm it. Let your film spools sit under running water for a while now, just to flush any other little bits of fixer or whatever off of it. After it's been flushed for a few minutes, you can add a drop of a "washing agent" to the water, which will help keep spots from forming on your negatives. There is, of course, a commercial product that does this, though you can just as easily use a tiny drop of dishwashing soap or a rinse agent like Jet-Dry. If you buy the commercial stuff, it comes in a wee little bottle. Since you are only using a tiny drop at a time, that bottle will probably last longer than you will.
(8) Hanging out. Now dry those negatives! Fancy dryers and such may have been all the rage back in the heydey of film, but hanging in your shower will work, too. Clip one of your clothespins or binder clips to the end of your film and gently ease it off the spool. Attach the other clip to the other end, and hang it up from one clip to dry. The bottom clip acts as a weight and pulls the film straight while it dries.
I happen to have one of those ceiling hooks in my shower at home (a gift from the previous owners) which works perfectly for hanging film. If you can suspend a plastic coat hanger or run a line, you can use laundry hooks to hold the film while it drips dry. A shower is not required, since all you're after is a place where film can drip undisturbed for a while without being coated in dust and curious hands. Basements, an empty closet with an old tub on the floor, etc..
When they're dry, you can cut between every fifth frame or so and slip them into protective sleeves. Admire the magic! Those tiny little images! You made that.
Celebrate! You're done!
OK, did that seem long? It is, and it isn't. Once you get going, it's a surprisingly fast operation, and most tanks will accommodate multiple reels of 35mm film, so you can get double the results for your time (just be sure to make a big enough batch of chemicals!) The longest part is the standing around agitating the tank and watching the clock, but it's worth the wait.
But now where, you ask, should the budget-minded retro-consumer go to indulge in this whim known as DIY developing?
Shopping Tips
Fumbling Around in the Dark
a contemporary guide to DIY film development for the chronically clumsy
a contemporary guide to DIY film development for the chronically clumsy
First, let me start at the end by recommending what I think is probably the best book for up-and-coming shutterbugs. It's simply titled Photography by Barbara London and John Upton and is the book that my dad got for me when he handed over his old Minolta. The illustrations are excellent, and drive home concepts like "depth of field" and how aperture and shutter speed work together to get a certain type of image on film. There are tons of books out there, but this is the one I always turn to, in no small part because of the clear illustrations and step-by-step photos. The edition I have is now hopelessly out of date with regard to modern camera technology, but the science hasn't changed. As such, I have cribbed mercilessly from them. Hey! I bet your library has a copy. Mine's the fourth edition, looks like they're up to the ninth edition now.
Also, a disclaimer. I have not tried -- nor desire to start -- at-home color film processing. Color is a more persnickety mistress than black-and-white: the chemicals are a bit more involved, the temperatures are higher, and the timing is far more exact. If you like sorting your sock drawer by style then size then color then fiber, color processing is for you, and this post is not. Sorry. I think the best place to get color done is at your local mega-mart, where a pimply teenager will be happy to give you a strip of machine-processed negatives in an hour for under $3, and maybe even scan them onto a CD for about $5 more. You can't beat that kind of a deal, folks.
Let's Begin!
To develop your own film, you need:
- A roll of exposed black and white film. And already, we have our first "gotcha." True black and white film is almost unobtanium these days. Those places that still sell film may offer a "faux" black and white, which is called "chromogenic"film. It says black and white on the box, it prints in black and white, but it's not actual-factual black-and-white film. It's actually just color film with no color layers. How do you know? If it says Process C-41 on the film canister or box, then this is color film, so prepare to hand this to our pimply teen friend. Kodak Tri-X and T-MAX, Ilford HP4 and HP5 are all "true" b/w films, and are what you should be looking for. See below for "shopping advice" when you realize you can't find it locally.
- Chemistry. There's surprisingly little involved here: a "developer" and a "fixer"are all you need, though there are other optional chemicals you can involve to make the process faster or easier. More on those when we get there.
- Total darkness (for a little while). This one is crucial, and I mean complete, can't-see-my-fingers-in-front-of-my-face darkness. You'll be handling film in the dark for the first bit of development, and any light at all will "fog" the film (aka, leave blotches on it or dim the image.) Blocking up the window and cracks around the door in a bathroom is typical, or stepping into a similarly blocked up closet. Personally, I use something called a changing bag for this step, since I have no easy access to a light-free room these days.
- Other stuff. No matter how low-tech you go, I think these are essential:
- Old clothes and an old towel or two, because nothing stains like film chemistry. Wear anything that will be enhanced by nasty brown splatters.
- Bottle opener: the old "church key" kind, not a cork remover. You need this to open the film canister in the dark.
- Clean jars to hold your chemistry (Mason jars are good and sturdy) and a liquid measuring cup, or some fancy graduated cylinders like you used in chem class all those years ago.
- A thermometer clearly readable around the 68 degree F/20 degree C mark.
- Something to hold your film in as it gets blended with the chemicals. If you're a real purist, you can do this in a plastic tub or old bowl, but why? Get yourself a decent daylight processing tank and a spool to hold the film. These are brilliantly simple: once you have wrangled the film onto the spool (in the dark!) put the spool in the tank, pop on the cover, and then pour the chemicals in through a special light-proof hole. See the shopping section below again for tips.
- A pair of binder clips or clothespins and a place to hang wet film overnight (showers are great for this.)
- A clock with a second hand that's readable from where you're developing.
The instructor of the adult-ed classes that I took was pretty much the example of your wild-eyed greybeard photographer, and could charitably be called particular in his preferences. One thing he did stress is you'll get a lot more mileage out of stainless steel than plastic reels and tanks, aka, "the thing that holds the film" and "the thing that the film and chemistry slosh around in." Plastic reels are supposedly easier to load, though he swore that they also made it easier to mangle film if you did it wrong. Stainless requires a bit more effort, but clean-up is a breeze. I inherited stainless from my grandfather, that's what I learned on, and that's what I use. Your mileage, as always, may vary.
Back now? OK, here's what you need to do:
(1) Igor, prepare the lab! If you're using anything that's going to be shared between chemicals (like a measuring cup) be sure to clean it out well between chemicals.
According to the directions that came with your chemicals, you're going to mix up a batch of developer, usually diluting a liquid or a powder by some ratio of developer:water.
"Stop bath" is generally not necessary, it's just the stuff you dump in after developing to make the developer stop doing its thing. Running water from the tap is fine here, and pretty common. If you're made of money, though, hey... stop bath away, my friend. I've read that acetic acid can be used here in a dilution, and have heard of some people using a vinegar bath here.
"Fixer" is the last real step. This is the stuff that gives the light-sensitive side of the film (the "emulsion") one final scrub before it goes out into the world and gets all fingerprinty. You may be diluting this to use once and then toss out ("one-shot") or just pouring from the bottle into your tank, and then pouring back later. Depends on what you bought, and I don't think one is any better than the other.
Crucial thing with the chemistry is that all your chemicals and waters should be about 68 degrees Fahrenheit/20 Celsius. This is an "about" temperature, and you can go over or under without much trouble. Wild temperature swings between steps will do funky things with your emulsion, as will very high temps. Your developer should have a recommended temperature printed on the bottle or the instruction sheet, follow that.
(2) In the dark, wind up your film. Open your film canister with the bottle opener. If you hold the film in your hand with the little knob bit pointing upwards, you should be able to get the opener on the lip of the bottom piece and pry it off. The film is loosely wrapped on a spool inside the canister, which will now evade your grasp and bounce all over the effing bathroom floor, unwinding as it goes. And now you know why I use a changing bag. This is just pair of black nylon bags, one inside the other, with a pair of elastic-cuffed sleeves sticking out. Imagine a windbreaker without a neck opening and you've got it. The idea is that you put all your "dark stuff" in the bag (spool, canister, film, bottle opener) and zip the bag shut, then pop your hands in the sleeves, and set to work. (Note: after opening the film and effectively locking your arms in the bag, it is required that your nose itch maddeningly for the duration.)
The film will be taped on to the little spool right at the end. You're strong enough to pull this off, the film will be fine (that end isn't exposed anyway.) Some directions have you trim off the tape, or the leader at the start of the roll. I say: they aren't hurting anything, and if you're using stainless steel (ahem) you can load the whole thing, tape, leader and all on the reel. Put the tape end in first, and finish with the leader. Besides, playing with scissors in the dark? Honestly. Doing this little trick does mean that you're going to unwind the whole roll of film to get to the taped end, but film is very curly, and will want to wind back up as it's coming off the spool. Go ahead and let it make a little neat roll in your other hand.
Winding film on a spool is the absolute hardest part of this process. If you can do that, you can do all the rest of this, and that's why I think people gravitate towards plastic. The best way to learn how to wind is to sacrifice some film -- any kind -- and practice loading, loading, loading in broad daylight until you get it. Then try it in daylight, but with your eyes shut. Then under a coat so you can't peek, etc.. You have to be able to do this step totally by feel, ideally by only holding the edges of the film. Once you have this step down pat, you're good to go. And you can do it. With practice.
(3) Place spool in tank, cover, and soak. If you're using a daylight tank, get your spool in there, place the lid on the tank, and turn on the lights or open the bag. Removing only the little light-trap cap, pour some water into the tank, enough that you're covering the film inside. I wait until it starts to splurt back out. Pre-soaking the film isn't required, but again, it's how I learned, so...
When you think about it, film is magical stuff. Teeny tiny little particles of light-sensitive stuff, hanging out in essentially dried Jell-O, waiting for the right chemicals to embiggen them into crystals visible by the naked eye. Pause for a moment here to be dazzled by the coolness of what you're doing. Digital weenies don't get to ponder this sort of thing.
(4) Bath time. Removing only the little light-trap cap, dump out the water from your tank. Pour in your carefully measured and temperature correct developer, noting the time when you do this, replace the cap, and gently agitate the tank. "Agitate" here means "hold the lid and cap on with your fingers as you slowly turn the tank over" not "shake the living hell out of the tank like you're mixing cocktails at your brother's wedding." A few easy inversions back and forth will do it. Some folks like to throw in a lucky tap or two on the counter to knock bubbles off the film at the end of a cycle: go crazy. Just don't make a frothy umbrella drink in your tank.
You'll be doing this agitation dance for a while, for a minute or so straight at the beginning, then a couple of inversions every 30 seconds for anywhere from about 15-20 minutes. Follow your developer's instructions. When I first started processing my own film, I would always panic at this step, since I'd be concentrating so hard on the agitating that I'd forget when I poured in the developer. I've since learned to wait until the minute hand was somewhere easy, and then repeat to myself the time it comes out on every inversion. "The film is done at 1:17... *swish*... the film is done at 1:17... *swish*..." I call it "photography Tourette's."
Not using a spool and tank? What, are you a masochist or something? OK, you can do this in the dark, though you'll have to have all your chemicals mixed up and ready in advance, and in open-air containers like old mixing bowls You can hold both ends of the film, and kind of rock it through the developer, working your way down the length of the film in a "U" shape and then back again. I don't know what you're doing for time, though -- maybe counting? Do the same thing for your bowl of fixer. As soon as you get out of the bathroom, though, get online and order a daylight tank and some reels.
Your developer package will tell you how long you need to soak your film: there's usually a table printed that shows major film brands vs. temperature, and you look up the number of minutes from that. Warmer developer means less time, but often results in grainier negatives. Too cold and the chemistry won't "take" as well. Follow the directions here, but don't panic if you're off by a degree or a minute or two. Black and white film is pretty forgiving.
Agitate every 30 seconds or so, with the last agitation ending in you dumping out the developer, either down the drain, or back into the bottle. If you did any sort of mixing to prepare your developer, then it's done, but if you're using pre-mixed stuff, you can be thrifty and mix it back in to your bottle. This recycling will eventually exhaust the developer and you'll need to get new stuff. (Caffenol is one-shot.)
(5) Stop, Dog, Stop! Development time all done? OK, time for the stop bath. You can use another chemical mix for this, or running water. I place my tank under the tap in the sink with only the little light-trap cap removed, and let water pour in and wash the film, periodically dumping it out to flush out any goodness floating near the bottom.
(6) Get fixed. The last real chemistry-ish step is to pour in the fixer. This takes less time than the developer, directions should be printed on the box/bottle/package about the amount of time, but it's typically on the order of a couple of minutes of occasional agitation. Fixer can generally be saved and reused. The fixer helps to harden the emulsion layer so it's tough enough to handle storage and scanning and the like.
(7) Wash up. If you've done everything in order, you should be able to safely expose your film to light now, and naught but the ravages of time and your own klutziness will harm it. Let your film spools sit under running water for a while now, just to flush any other little bits of fixer or whatever off of it. After it's been flushed for a few minutes, you can add a drop of a "washing agent" to the water, which will help keep spots from forming on your negatives. There is, of course, a commercial product that does this, though you can just as easily use a tiny drop of dishwashing soap or a rinse agent like Jet-Dry. If you buy the commercial stuff, it comes in a wee little bottle. Since you are only using a tiny drop at a time, that bottle will probably last longer than you will.
(8) Hanging out. Now dry those negatives! Fancy dryers and such may have been all the rage back in the heydey of film, but hanging in your shower will work, too. Clip one of your clothespins or binder clips to the end of your film and gently ease it off the spool. Attach the other clip to the other end, and hang it up from one clip to dry. The bottom clip acts as a weight and pulls the film straight while it dries.
I happen to have one of those ceiling hooks in my shower at home (a gift from the previous owners) which works perfectly for hanging film. If you can suspend a plastic coat hanger or run a line, you can use laundry hooks to hold the film while it drips dry. A shower is not required, since all you're after is a place where film can drip undisturbed for a while without being coated in dust and curious hands. Basements, an empty closet with an old tub on the floor, etc..
When they're dry, you can cut between every fifth frame or so and slip them into protective sleeves. Admire the magic! Those tiny little images! You made that.
Celebrate! You're done!
OK, did that seem long? It is, and it isn't. Once you get going, it's a surprisingly fast operation, and most tanks will accommodate multiple reels of 35mm film, so you can get double the results for your time (just be sure to make a big enough batch of chemicals!) The longest part is the standing around agitating the tank and watching the clock, but it's worth the wait.
But now where, you ask, should the budget-minded retro-consumer go to indulge in this whim known as DIY developing?
Shopping Tips
- Post on Craigslist and Freecycle for developing stuff. Seems like everyone's getting rid of their film stuff these days, and surely there's someone in your area who has "made the switch to digital" (the fools!) and would hand over their stuff on the cheap.
- Scour eBay, for the same reasons as above.
- Web merchants include B&H and Adorama in New York and Freestyle out here on the left coast. At first glance, doing your own black and white may look a bit... spendy. Film isn't cheap, nor chemicals, nor *sigh* shipping, but figure this: to have blank and white done here, it cost me about $15 per roll (develop + print) at the fancy pro lab near my office, and that's the only game in town. Otherwise, it would be sent out... somewhere? And how long will it be away? And how satisfying is that, truly?
- You can always get better equipment later. Mason jars and thrift-store pitchers work fine to hold chemicals. No changing bag? Use two black plastic garbage bags (one inside the other) under a heavy coat. Again, you don't need much, just film, darkness, and chemicals. Everything else is there to make it more convenient. There's all sorts of devices for rotating tanks and drying negatives and the like, but you don't need it right away. Start small.
- Ilford's pamphlet (PDF) biased towards their own products, of course, but with nifty illustrations
- Kodak pamphlet (PDF) showing charts of film vs. developer, and laying out the steps
- flickr user On_Sidewalks' topic about budget b&w developing (nice photos!)
- The flickr group I Shoot Film is a great resource, too. Folks there seem genuinely helpful, and it's not a braggy look-at-my-pics group.
Tuesday, May 5, 2009
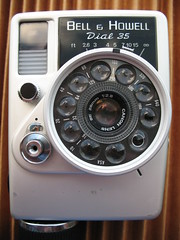
The Big Wind Up
 I'm a little tightly wound right now. Our parish is gearing up for their annual festival/carnival/fete/what-have-you and my home is overtaken with decorations for it. School is drawing to a close, and my young'uns are getting progressively more animated and anxious, especially as that means that the vacation is now only a month away. Everyone's quite busy at work, heading for our twice-a-year project deadlines. Everything is my life is in motion now, like an armload of ping-pong balls tossed down a stairwell.
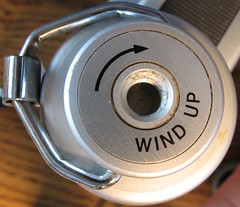
I know I've been talking about it for a while here, but I'm also finally getting back into film, slowing acquiring the necessary bits to hang on to this particular bit of outdated knowledge. And of course the camera-acquisitions have been going on unabated, though like my typewriter bender of last year, I think I'm just about sated, having more toys than time right now. I say this now, still basking in the post wind-up excitement of a long-awaited delivery, pictured above. You can look up the particulars yourself but the short version is: it's another half-frame, squeezing two photos into the space of a typical 35mm negative, and for the true retro-geek, it's got a clockwork film advance. About as useful as the "Power Space" key on a certain typewriter line (and twice as noisy) but really... could I resist it? On the bottom of the winding knob/handle is the legend "Wind Up." Very Alice in Wonderland. I've wanted to find out about this camera since about 1992, when I first saw it in use on a repeat of The Prisoner (see Many Happy Returns, at the 9:00 mark.) I've already confessed my love of all things Cold War-spy-era, and the camera lust goes back well before that. Luckily for me the Intertubes finally caught up with my random obsessions. Curse you, system of networked computers that makes every impulsive wish come true!
And speaking of impulsiveness, I have 2/3 of the ingredients for Caffenol, thanks to the coffee and pool supply sections of Safeway (sodium carbonate = "pH Up" for those of you playing along at home in swimming pool-friendly areas.) I'm in for a penny now, so I'll be ordering some fixer and film, and yes, probably some real developer as well from that selfsame place that got me into this mess in the first place and maybe the only place that will survice the Econolypse: the accursed/beloved 'Net. While I'm agressively refreshing that "shipment status" page I can get myself all worked up about The Prisoner remake that's in post-production now.
Subscribe to:
Posts (Atom)