
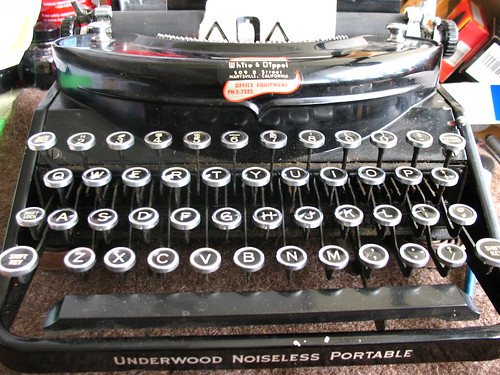
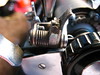
Ted's database puts this in 1934, which is a fine year for typewriter style. The keys on this machine look brand-new, though there are a few issues below the dirt-and-grime layer. The drawband is snapped, as one would expect in a machine this age. The bell doesn't ring, though the mechanisms appear to be complete.
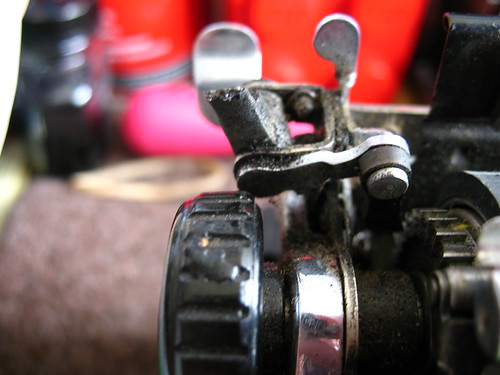
Being a little preoccupied today, I also failed to notice that the return lever is missing.
If I was earlier in my type-accumulating career, I might have thought this an impassable obstacle, but it looks more like a hassle than anything else. I can always advance the line by hand for now, and maybe I can take a page from the Filthy Platen Playbook and have my own replacement made. I'm shockingly unstressed about the whole thing.
UPDATE: Scott's machine was identical. Not only can I have a replacement made, but I can use his very design. This is where the Typosphere is a Huge Win, people -- collectors helping collectors, worldwide.
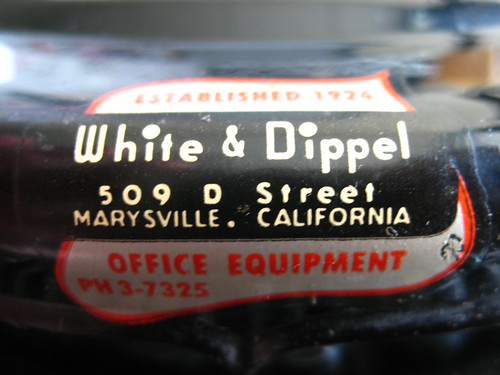
Besides, I'm a huge sucker for old repair shop labels, and I love this one, right on the front of the machine.
Wounded or not, it would have hurt to leave this one behind.
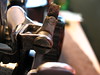
UPDATE: a few more macro shots showing the site of the broken lever. Click to empixelate.
12 comments:
Very nice find, and awesome that someone else gets to benefit from Filthy Platen's 3d-printed return lever design. :D
I way love that shop sticker too.
Congratulations on a great find! Missing return lever is minor.
I hope the draw string replacement will be easier than the one on the Remington Noiseless Model 7.
@Bill, I hope not, though I think this is a Remington-made machine. The good news (?) is that I've already looked into the eye of madness by changing the drawcord on a much later-model Remington Monarch that had the added bonus of a large bar right in the way that I had to work around. This looks to have about the same degree of complexity -- there's a plate covering the spring, and I think I need to remove that to get at the cord.
I have a Rem Noiseless and a Model 1 that I can look at to see where everything goes. Stay tuned...
Okay... I've been a little lazy, and I haven't revised the design yet. So I'd better leave a couple of notes on this guy.
Firstly, you'll need to do a little drilling. The shaft hole comes off the printer being under-tolerance, and you'll need to shave the inside out a little. I used a 5mm drill bit, but if you only have imperial available, you can use a 13/64 - which is slightly bigger then 5mm, but within tolerance.
Trust me, it is better doing the drilling anyway, as the surface in the hole otherwise may have been too rough - and have caused wear. Remember this is steel, so it is damn tough.
Secondly, while the design works fine on the machine, it tends to not quite sit flush when folded down and out of the way. It wont interfere with closing the case, but it wasn't quite as perfect as I wanted it to be.
Getting the part into the machine is going to be the harder than drilling it. you will need to remove the platen, and access the platen advance from the platen side, and loosen a few screws off. I can't see the tension return spring in your photo either - but it is supposed to wrap around the barrel of my lever design, and hoog onto a small nib inside the tiny bracket, and press against the lever. Before you do, check and see if the pulley that the string slides around hasn't jammed. I have come across a few machines where this pulley has been rusted into place, and has cut the string.
If you have enough string left, it will be easiest to simply tie it to it. But I have seen people suggest winding the spring up way higher than you need, and slotting a length of string into the hole before releasing the spring a little then winding a couple of lengths around the barrel - apparently works.
If you get stuck, let me know.
Oh yeah, and make sure you get some oil into the shaft, and the bracket. Is it just the photo? Or has the bracket that the lever sits in bent a little? My one was bent, and I just needed to re-adjust it with some pliers.
Love the White & Dippel decal!
Good luck with the repair. There may be a few kinks, but this is a great example of intercontinental assistance in the typosphere, using digital technology.
@Scott: I'll probably pepper you with questions and unreasonable demands for photos once the part comes in. I remember the caveat about drilling from your post, so I'll leave some time to chase down a proper-sized bit, if I don't have one at home. I went for the plain stainless finish, so I might spend a little time giving it some polish -- we'll see. Looks like I should have it in around three weeks.
I do appear to have the tension spring in place from the original lever. I'm not seeing why I'd need to remove the platen, other than to push the little metal tongue (for want of a better word) back into place so it catches the toothed wheel. Perhaps that's what you mean. I'll likely assault you with my own photos, too. If the bracket is bent, it's very slight.
The drawcord replacement will probably go like the Monarch, which is the process you described. Wind up the spring so the tension is up toward the middle of the drum, fish old the old line, and then slip in the replacement. It takes about five hands and copious amounts of salty language to do properly.
I think you'll be fine. You seen to know what you're doing.
The bracket is quite soft, so it should bend back without a huge amount of effort.
The small arm that pushes the platen should be hovering over the teeth of the cog on the platen's side. It's a bit out because of the bend, but when you put the new lever in, drop the parts into a cleaning solution and work them a bit. The black extension on that arm tends to get filled with muck, and stick into place. There's a very small spring inside that keeps it located, and isn't quite strong enough to contend with it getting filled with muck.
that's a gorgeous machine, glad you saved it.
Nice find! And very nice label!
Too bad the return lever is broken, but on the other hand it gives you something new to try out. Enjoy yourself!
"White & Dippel"! Yeah, that's my favorite part.
Could you could post some further pictures and description of the return advance mechanism? I need to rebuild one that was broken to begin with, so I don't know how it is put together.
Post a Comment